I'm making a multiplayer game in Unity using the Mirror networking api which built upon the now deprecated Unity one. I got a local host system working fairly quickly but I wanted to get a version up on the web I could play with others to validate my ideas. I looked for tutorials and it was a bit of a mess, so I'm going to try to document all the successful steps I took to get the bare minimalist thing working:
Step 1: Build the server in Unity
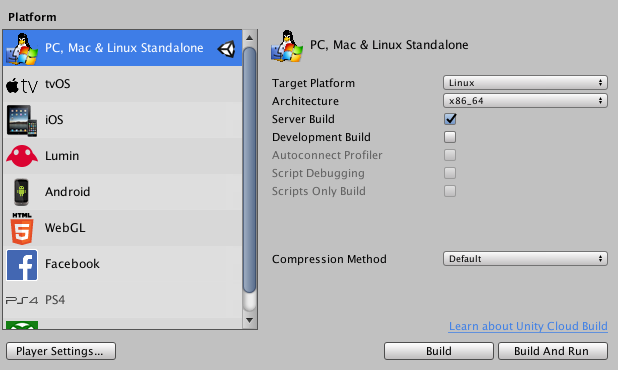
File > Build Settings
Choose Standalone, Linux, x84_64, Server Build:
 Click Build and choose a reasonable directory and filename, for me I used
Build/Linux/headless_server.x86_64
Make a directory called server/ which will contain all your configuration files for running the server.
Now zip your server into a file in that directory:
zip -R server/HeadlessServer.zip \
    Build/Linux/headless_server.x86_64 \
    Build/Linux/headless_server_Data
Note: You should test the server works on your local host. If you are on Mac like me, just recompile a mac version of your server, run and connect a client to it. You want to make sure it works before you do anything else below.
Learn about Docker
Docker is a way to put your server in a container that has exactly what it needs to run and no more. These instructions are for Mac OS but you can find similar instructions for your OS. Basically download this file: https://download.docker.com/mac/stable/Docker.dmg and install it. For more details I followed https://www.thegeekdiary.com/how-to-install-docker-on-mac/.
Once I had that installed, I needed to make a container for my server. You create a Dockerfile that basically explains how to build your setup. Mine looks like this:
FROM ubuntu:latest

LABEL maintainer="username@example.com"

RUN apt-get update -qq; \
apt-get install -qq -y \
zip \
&& apt-get clean \
&& rm -rf /var/lib/apt/lists/*

COPY HeadlessServer.zip .
RUN unzip HeadlessServer.zip

RUN useradd -ms /bin/bash unity
RUN chown unity:unity -R Builds/Linux/headless_server.x86_64
USER unity

ENTRYPOINT ./Builds/Linux/headless_server.x86_64
One you have that file, you can build it as follows (change [USERNAME] to your name):
docker build . -t [USERNAME]/headlessserver
Lets test it. In a new terminal use
docker run -t [USERNAME]/headlessserverAnd your server should be running on your localhost. Connect a client to it to confirm it works. Now you'll try to kill it with Ctrl-C and it hasn't actually killed the process:
docker ps
docker stop [container]
A note. This is all happening in your localhost, but you actually want to put this out into the world.
So you need a place to push your container on the web.
The default is to use Docker Hub which lets you have one private repository for free
(or you can make it public but I doubt you want to for your game). So I signed up for that, then had to
point my local docker instance to it:
docker loginNow we can build and push it to your repository (changing [USERNAME] to your username and headlessserver to your repository):
docker build . -t [USERNAME]/headlessserver:latest
docker push [USERNAME]/headlessserver
# Confirm it worked:
docker pull [USERNAME]/headlessserver
Kubernetes and Google Cloud
Kubernetes is a way to describe how to deploy and connect those docker containers you are making. This tutorial will be specifically for how to get that server working on Google Cloud using kubernetes. First, we have to set things up. I already had gcloud installed and a Google Cloud account for this website. Go through those steps:
- Sign up for a free Google Cloud account https://cloud.google.com/free/. It'll give you $300 in credits to let you play with this stuff.
- Install the Google Cloud SDK, which includes the gcloud and kubectl command-line tool.
- Install the kubectl command-line tool:
gcloud components install kubectl - Configure a default region and zone, I used us-central1-a. If you didn't get asked while installing it you can run:
gcloud config set compute/zone us-central1-a - Visit the Kubernetes Engine page in the Google Cloud Platform Console.
- Create or select a project.
- Wait for the API and related services to be enabled. This can take several minutes.
- If you haven't already, Enable billing for your project
-
Create a cluster. You can use the web interface or something like:
gcloud container clusters create [CLUSTER_NAME] \ --cluster-version=1.11 \ --no-enable-legacy-authorization \ --tags=game-server \ --enable-basic-auth \ --password=supersecretpassword \ --scopes=gke-default \ --num-nodes=3 \ --machine-type=n1-standard-2 -
Tell gcloud all about your cluster:
gcloud config set container/cluster [CLUSTER_NAME] gcloud container clusters get-credentials [CLUSTER_NAME] -
Last step. You need to let kubernetes see your private docker repository
(if you made it private). See Pull Image Private Registry instructions.
I ran this command to create a secret named "regcred" that we an use to access it (Note this will put your password in your bash history):
kubectl create secret docker-registry regcred \
    --docker-server=https://index.docker.io/v1/ \
    --docker-username=[USERNAME] \
    --docker-password=[PASSWORD] \
    --docker-email=[EMAIL]
Lets actually use Kubernetes
Now that we are somewhat setup. We can now make a deployment that will create our server and if it dies, recreate it. Create a file deployment.yaml:
apiVersion: apps/v1
kind: Deployment
metadata:
  name: my-deployment
spec:
  replicas: 1
  template:
      spec:
        hostNetwork: true
        imagePullSecrets:
          - name: regcred
        containers:
          - name: dedicated-server
            image: [USERNAME]/headlessserver:latest
            imagePullPolicy: Always
            ports:
              - name: default
                containerPort: 7777
We can deploy it:
kubectl apply -f deployment.yamlkubectl get deployments
kubectl get pods
kubectl get pods -o wide
kubectl describe pods
I'm assuming things are working for you (there aren't errors in any of those screens).
But note we still can't connect to our server, we have to expose its port:
kubectl expose deployment my-deployment \
    --type LoadBalancer --port 80 --target-port 7777
kubectl get services
Try it! Now you should be able to access your game through port 80 on the EXTERNAL-IP listed above. Run a client of your game using that IP and port. If you are using Mirror change the TelepathyTranport port and change localhost in your NetworkManager to the ip address
You should have a single game server running that your clients can reach. Obviously you're not ready for production but at least you have a hello world server that is running your game code. Longer term you'll need to architect something probably involving matchmakers, etc.